How To Create A Button Link

Do You Love the Sharp Look of a Button?
So do we! Our text editor will create a button link for you... and you don't have to know a thing about HTML code!
Just follow these steps to add a button link in any text box on your ChurchSpring site...
1. Once you have logged in to your site, open your text box edit mode by clicking the little black pencil icon at the top of the box.
2. Create the "Call to Action" text that you want to be on your button and highlight it using your cursor.

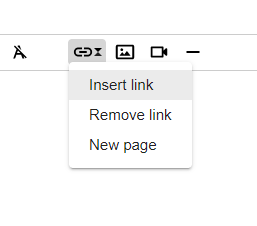
3. Locate the "Link" icon on your text box toolbar. It will look like this:

4. Click on the Link icon and select "Insert Link."
5. Decide what kind of link you want to insert and click on it. If you choose an external link, you can choose to open the link in a new window.

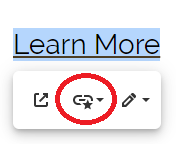
6. Once you have added the link to your text, you will need to click the Button Link Style icon...
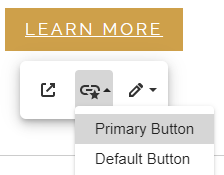
7. Chose your style of button by clicking on Primary Button or Default Button...
Once you have done this, all you have left to do is to click SAVE at the bottom of the page! And, wa-lah! You have created a sharp button that contains a link! Good job!
Not only do you have the option to create standard buttons, but you also have the option to create a ChurchSpring Giving button ANYWHERE ON YOUR SITE!
Once you have ChurchSpring Giving setup, just follow these steps to add a GIVE button link in any text box on your ChurchSpring site...
- Pull up your website and log in. Once you have logged in to your site, go to the page where you'd like to add information about giving.
- Add a block in which you would like to place the information. For this example, I selected a "Blank Text Box".

3. Open your text box edit mode by clicking the little black pencil icon at the top of the box. It'll look like this:

4. Give a brief title and some information on what exactly your members will be giving towards. Then wherever you would like to place the Give Button, Locate the "Button" icon on your text toolbar.

5. You'll then be given the option of a standard or Give Button. Select the "Give Button".
 6. A button titled "GIVE" will appear. It will have a pencil icon as well as a delete icon in the top right of the button.

7. When you press the pencil icon, you'll be given the option of changing the buttons' color, text, and what fund you would like it to go into. You can also see a preview of what your button will look like on the right.

8. Once you are happy with your button press "INSERT BUTTON". If everything looks good you are ready to press "save".

Your button is now loaded on your page and members are free to click and start GIVING!
If you have any questions about creating a button link, please reach out to our team. We are always happy to help!